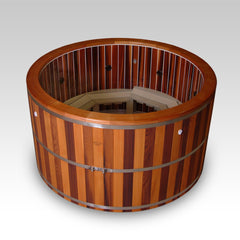
Success Stories

System Three & Seaview Boatyard: River Boat Restoration Project

Thursday, November 29th, 2012

Boat Restoration gives new life to the last active Cataract river boat in the Grand Canyon.

Greg Reiff and the Sandra.
Photo: Stephen J. Krieg

Greg Reiff, grandson of Sandra’s designer and builder Norm Nevills, reports on the boat restoration project:

It is with extreme gratitude and pleasure that I offer my huge thanks to Phil Riise of Seaview Boatyard and the staff of System Three Resins, Inc. for their assistance in helping to repair my 1947 Cataract boat.

My grandfather, Norm Nevills, was the first commercial river outfitter in the Grand Canyon, guiding river trips down the Colorado River as early as 1936. He built six different Cataract boats in the course his career. The now restored Sandra was the last Cataract boat he built (1947) before being killed in a plane crash in 1949. Three of the original six Cataract boats currently sit in museums around the southwestern United States with the Sandra being the only one that has been restored and is in active use. For the past seven seasons our river company Canyoneers Inc. used the Sandra on 14-day trips along the Colorado River through the Grand Canyon.

The Sandra was the last boat built by legendary river runner Norman Nevills of Mexican Hat, Utah. Nevills was the first commercial river runner in Grand Canyon, and he called his design a cataract boat, built to be quick in the whitewater rapids. The Sandra was built in 1947 and named after his younger daughter, Sandy.

In 2000 the Sandra was restored by Colorado River dory boat builder Andy Hutchison. And After 500 plus loving hours the Sandra as brought back to her original 1947 beauty, design, and style.

Currently, I row the Sandra on the three Grand Canyon trips each summer – June, July , and August. Sandra is the only remaining wooden Cataract boat still in use in the Grand Canyon from the 1930’s – 1940’s wooden boat era. Canyoneers Inc. passengers and fellow Grand Canyon Colorado River boatmen often seem intrigued by the Sandra’s classic boat design, her exhilarating ride, and her historic place in Grand Canyon history – that of being one of the first commercial river boats used in the Grand Canyon during the 1930’s – 40’s.

The river wear and tear on the Sandra since her original boat restoration in 2000 has been significant. Sandra had seen the effects of her rigorous river schedule as the 65 year old wood in the boat started leaking along her chine and stern areas and she was in bad need of a major overhaul.

Sandra Grand Canyon Cataract Boat, post restoration

Photo: Stephen J. Krieg – www.naturalmoment.com

As a passenger on my July 20112 canyon trip, Phil Riise was immediately intrigued by Sandra’s unique hull design, the exciting ride that she offers, and her historical significance. Being a water person through and through, Phil Riise helped me make some minor repairs on Sandra during our river trip. After the trip he mentioned that he wanted to help repair her further and mentor me on the boat repair during the upcoming off season. Phil mentioned that he knew of the finest epoxy and repair products available to do the needed repairs. Phil spoke confidently and firmly about System three’s products and how they could fully help restore Sandra’s old and punky wood without losing her historical significance and hull lines.  Phil is not only an interesting, fun, and great man; he also has become a mentor in historic boat repair – all the while teaching me how to use the quality products of System Three Silver Tip Epoxy, GelMagic, QuikFair and pigments, etc.

Phil Riise was 100% correct about System Three’s quality products and ease of use for historic boat repair and restoration. Thank you very much for developing such fine, user-friendly, and handsome products. These products certainly will help to keep the Sandra beautiful, functional and ready for the 2012 Grand Canyon boating season.

I look forward to sharing with fellow river men about System Three’s quality epoxies, resins, hardeners, gels and simply overall top notch wood boat restoration products.

Sincerely,

Greg Reiff

Sandra Cataract boatman

Canyoneers Inc. river guide


Hot Tubbing with SilverTip Epoxy

Friday, February 11th, 2011

Super "R" Hot Tub

This is the Super “R”  hot tub from Maine Cedar Hot Tubs, Inc. The outer shell of these tubs is constructed from an oil finished Western Red Cedar and accented with brushed stainless steel bands to mirror the appearance of the traditional cedar or redwood tub.

Maine Cedar Hot Tubs, Inc. use System Three Silvertip Epoxy to cold-mould and overlay the cap rail, base rail, and inner shell of the tub. This process yields an extremely durable and waterproof vessel with a character and appearance that is more like a piece of fine furniture than a hot tub.

The void between the inner and outer shells contains the jet piping and four inches of closed-cell foam insulation; the “R” factor, as built, is 25 making these tubs very economical to operate. The cold-moulded portion of the tub that is pictured is done with cedar facing, however, any wood that the customer desires can be used. Previous materials used include teak, cherry and various figured hardwoods all with stunning results. The tubs are available in nominal diameters of 5 through 8 ft. and to any depth the customer desires.

www.mainecedartubs.com

Samantha Malay Uses MirrorCoat for Metal Tiles

Friday, February 11th, 2011

I like to make durable surfaces using resin and small pieces of salvaged metal.  I learned about MirrorCoat™ from Darin Montgomery, furniture designer-builder and owner of Urbancase.  Nick Gucker at System Three Resins was very helpful, by phone and email, when I had technical questions about its use.

Poolside #6

Poolside #6

I start with an image on paper, often a detail from my collection of vintage travel postcards, which I glue to the clean and sanded metal.  I may drill holes in the upper corners of the metal at this point, if it’s to be a hanging piece.

I use discarded cookie sheets to place my metal pieces on.  These are handy for several reasons:  the lip on the sheet prevents over poured MirrorCoat from oozing everywhere, and when they’re done curing, a quick twist of the tray releases them. 

Poolside #9

Poolside #9

I wear thick rubber gloves (latex ones can stick and pieces may remain on the working surface) and tie my hair back.  I mix MirrorCoat according to the instructions and pour it over my metal pieces.

 Unless I have a fairly dust-free workspace, I find a cardboard box large enough to fit over the tray, which allows good airflow while keeping debris off the resin.

After they’ve cured thoroughly, I pry the metal pieces off the tray, use a rasp to get the big over pour chunks off, and sand the surfaces, being careful not to over-sand the sides (this can create thin spots that could let moisture in, undesirable if I’m planning to use them outdoors.  Also, if the MirrorCoat does not entirely encase the metal piece, it may not be suitable for wet environments, as the metal will begin to rust, and the resin will begin to resist, rather than seal, the metal.)

 I sometimes pour a second coat of resin at this point, allow it to cure, then re-sand.  I like to apply a UV-resistant spray as a last step.  MirrorCoat creates a translucent finish that adds depth and glint to the image beneath.

Poolside #13b garden tile + plants

Poolside #13b garden tile + plants

You can see Samantha’s work at Twilight Artist Collective in West Seattle, twilightart.ning.com/profile/SamanthaMalay

See Urbancase at http://www.urbancase.com/.

Photos by Benjamin Malay, http://www.benjaminmalay.com/.

Send us your success story.

Friday, December 17th, 2010

Send us your stories of epoxy projects using System Three products. We may publish them in this area. (please attach photos to your e-mail – rgb jpeg format no larger than 500k) Be sure to come back as we will continuously update this area with stories from around the world!

Custom 10′ skiff

Tuesday, December 7th, 2010

My latest project, a ten-foot, flat bottom skiff. Designed and built by yours truly. The boat was built with 1/4″ meranti plywood from Edensaw, and of course, System Three general purpose resin and T-88, (purchased from Revchem in Tacoma).

10' Custom Plywood Flat-Bottom Skiff

This is actually my fourth boat in the past five years or so.  A picture of my kayak is still on your web site. I have to confess, that I have tried a few other epoxies over the past years, and I keep coming back to System Three!

To me, the acid test for an epoxy is it’s resistance to cratering when applied over a sanded, epoxy coating, compared to other brands, System Three does every time. I hope you continue selling the general purpose resin, because I’m afraid to try any other resins! 

I want to include your new SilverTip stuff! I may have to break down and try some EZ-Fillet, and Gel-Magic on my next project,  though.

Yours Truly,
George Burns

Scribner’s Skiff

Tuesday, December 7th, 2010

Stitch & Glue Montana Boatbuilders Skiff

I built a stitch and glue Montana Boatbuilders  Skiff from a kit using Silvertip Epoxy with slow hardener. It was a great project and continues to be great fun.

 Bill Scribner

Cheyenne, WY

The GoldenEye Standard

Monday, December 6th, 2010

Pygmy Boats The GoldenEye Standard

This is a picture of my Pygmy Boats GoldenEye Standard.  I made a hybrid version of this because I wanted to try strip building but I was inexperienced.  So I decided to try it on the deck only.  The hull is made up of 4mm Okume Plywood and the deck is made of up White Ash, Honduras Mahogany, and Black Walnut combinations.  I used System Three products in every aspect of the building process from gluing the plywood panels together, wetting out the fiberglass cloth, and the polyurethane coating of the whole kayak.  I love the products that I am using from System Three and will continue to use them on my next kayak project. 

Glenn Brzyski 

Designer and ASME Certified GDTP
Moog, Inc.

Searunner Trimaran

Thursday, December 17th, 2009
Searunner Trimaran

Searunner Trimaran

The first boat built with System Three General Purpose Epoxy was a trimaran named “Orion”. Built by our founder Kern Hendricks and launched in 1981, she sails today and has crossed the Pacific Ocean.

Rail Repair w/ T-88 in the u-TAH dispenser

Thursday, December 17th, 2009
Rail Repair w/ T-88 in the u-TAH dispenser

Rail Repair w/ T-88 in the u-TAH dispenser

Oak Railing repaired after 10 Years with System Three T-88 Structural Epoxy Adhesive & the u-TAH Cartridge System I bought my home in Freehold, NJ, back in July of 1997 and I’ve been staring at this split railing at the top of my staircase from the get go. I’m not sure how long it was like that before we bought the place, but let’s figure it’s been like that for, at least, 10 years. I’ve been sick of staring at, but since I couldn’t even pull the delaminated piece back to the main body with my bare hands, I figured it would be a tough chore (probably require a bolt, which wouldn’t look so clean). I then contacted System Three Resins, a company out of Auburn, Washington, who is renowned for their strong wood glues. They suggested that I use their T-88 Structural Epoxy Adhesive, so I went to a local retail wood (sp?) store and picked some up. It came in two ketchup-type squeeze bottles (resin and hardener), which you had to measure in equal amounts, mix with a stick (I used a tongue depressor) and then try to apply it. As you can see from the picture of my split railing, it was going to be difficult to apply this adhesive into the very tight/narrow areas, in which it needed to be applied (I needed full coverage to ensure a good enough bond). I quickly realized that this was a messy, inconvenient way to apply this adhesive, even if it was an excellent product. I called System Three back and explained my dilemma. They immediately advised that they now offer this same great adhesive in an easy to use caulking tube, made by a company called TAH Industries, called the u-TAH Cartridge System. This system works in a standard caulking gun, which I had, and with the use of a static mixer, there was no measuring and manually mixing the material with a stick. You simply attached the static mixer, which had a small enough outlet to get into tight spots, drop the whole thing into a caulking gun, and apply your adhesive. It was that simple!

V-2 Rocket

Thursday, December 17th, 2009
V-2 Rocket

V-2 Rocket

Alan Overmoe’s model V-2 rocket takes off from the Salt Flats. The rocket fully loaded weighs 105 pounds and is powered by an “N” motor. Top speed is 725 feet per second, just under the speed of sound. Alan hails from Salt Lake and has built a white water dory using System Three epoxy. To shoot rapids or rockets, that is the question…